Managing Meal Breaks with Microsoft Teams

Preface

Actual solution cannot be shared. It does not include any HIPAA non-compliant information, but the solution does involve proprietary technologies owned by my employer. This was developed as a stop-gap solution to an issue posed as a change in legislation required more rigid break systems for Illinois based employers. This was not intended to be a permanent solution, rather an improvement over an existing one.

Background

In January 2023, the One Day Rest in Seven Act was passed in the state of Illinois. The largest item of note was the requirement for employers to only schedule employees a maximum of six continuous days. However, a smaller footnote would cement policies that most workplaces would follow, dictating when an employee is entitled to a half-hour meal break and a twenty (20) minute break. To ensure that all campuses complied with Illinois state law, our HR policy was amended to indicate the requirement of department heads and leadership to ensure that employees took their breaks. However, to effectively do this, there are 2 parts of each step in each part of the process. In my experience, the more complex an implementation is, the less likely a policy is to be followed fully. And as expected, this was what happened. Employees were not fully completing all steps to ensure proper documentation of their meal breaks. What then was this process?

  1. Employees would need to claim their meal break time at the start of their shift in a document to ensure department head tracking and access.
  2. Employees would need to indicate the start of their meal break by messaging a specific chat to ensure leadership knew the gap in coverage.
  3. Employees would need to indicate the return from their meal break by messaging a specific chat to ensure leadership knew the coverage was filled.
  4. Employees would need to sign off on their meal break time after their break was completed but before the end of their shift.

In comparison to how this was done by most other employers, it was clear that this was a short term solution waiting to burst at the seams for multiple reasons.

  1. Finding the correct document to claim their meal break time was difficult, especially for employees who were not regularly attached to a single computer. The vast majority of our department is designed to go between units to complete clerical work as needed.
  2. Finding the correct chat to indicate the start and end of a break suffered the same issue while existing in an entirely different location.
  3. Policies on properly indicating were communicated in a manner that did not clear up repeated confusion on the subject, most notably lacking examples of proper communication of break start and end times.

And as silly as it sounds, it only seemed odd to me that something wasn’t implemented sooner. Documenting meal times was normal for every other company I had worked for. However, since it was a new system, everyone in my department was complaining. It quickly became my point of frustration, not that it was complicated, but that people would not stop complaining that there wasn’t a better solution.

The Problem

It can be boiled down to a user experience issue. It’s cumbersome, complicated, and slow, and to the user, there is very little to get out of it. I think it would be most comparable to fishing in the intro of The Legend of Zelda: Twilight Princess, being strictly required to progress the story and grants no direct reward to the player. As my portfolio suggests, streamlining processes can be quite enjoyable to me and while we did not implement this pending a new official process being released the first of June, it still provided a learning experience.

Conceptualizing the solution

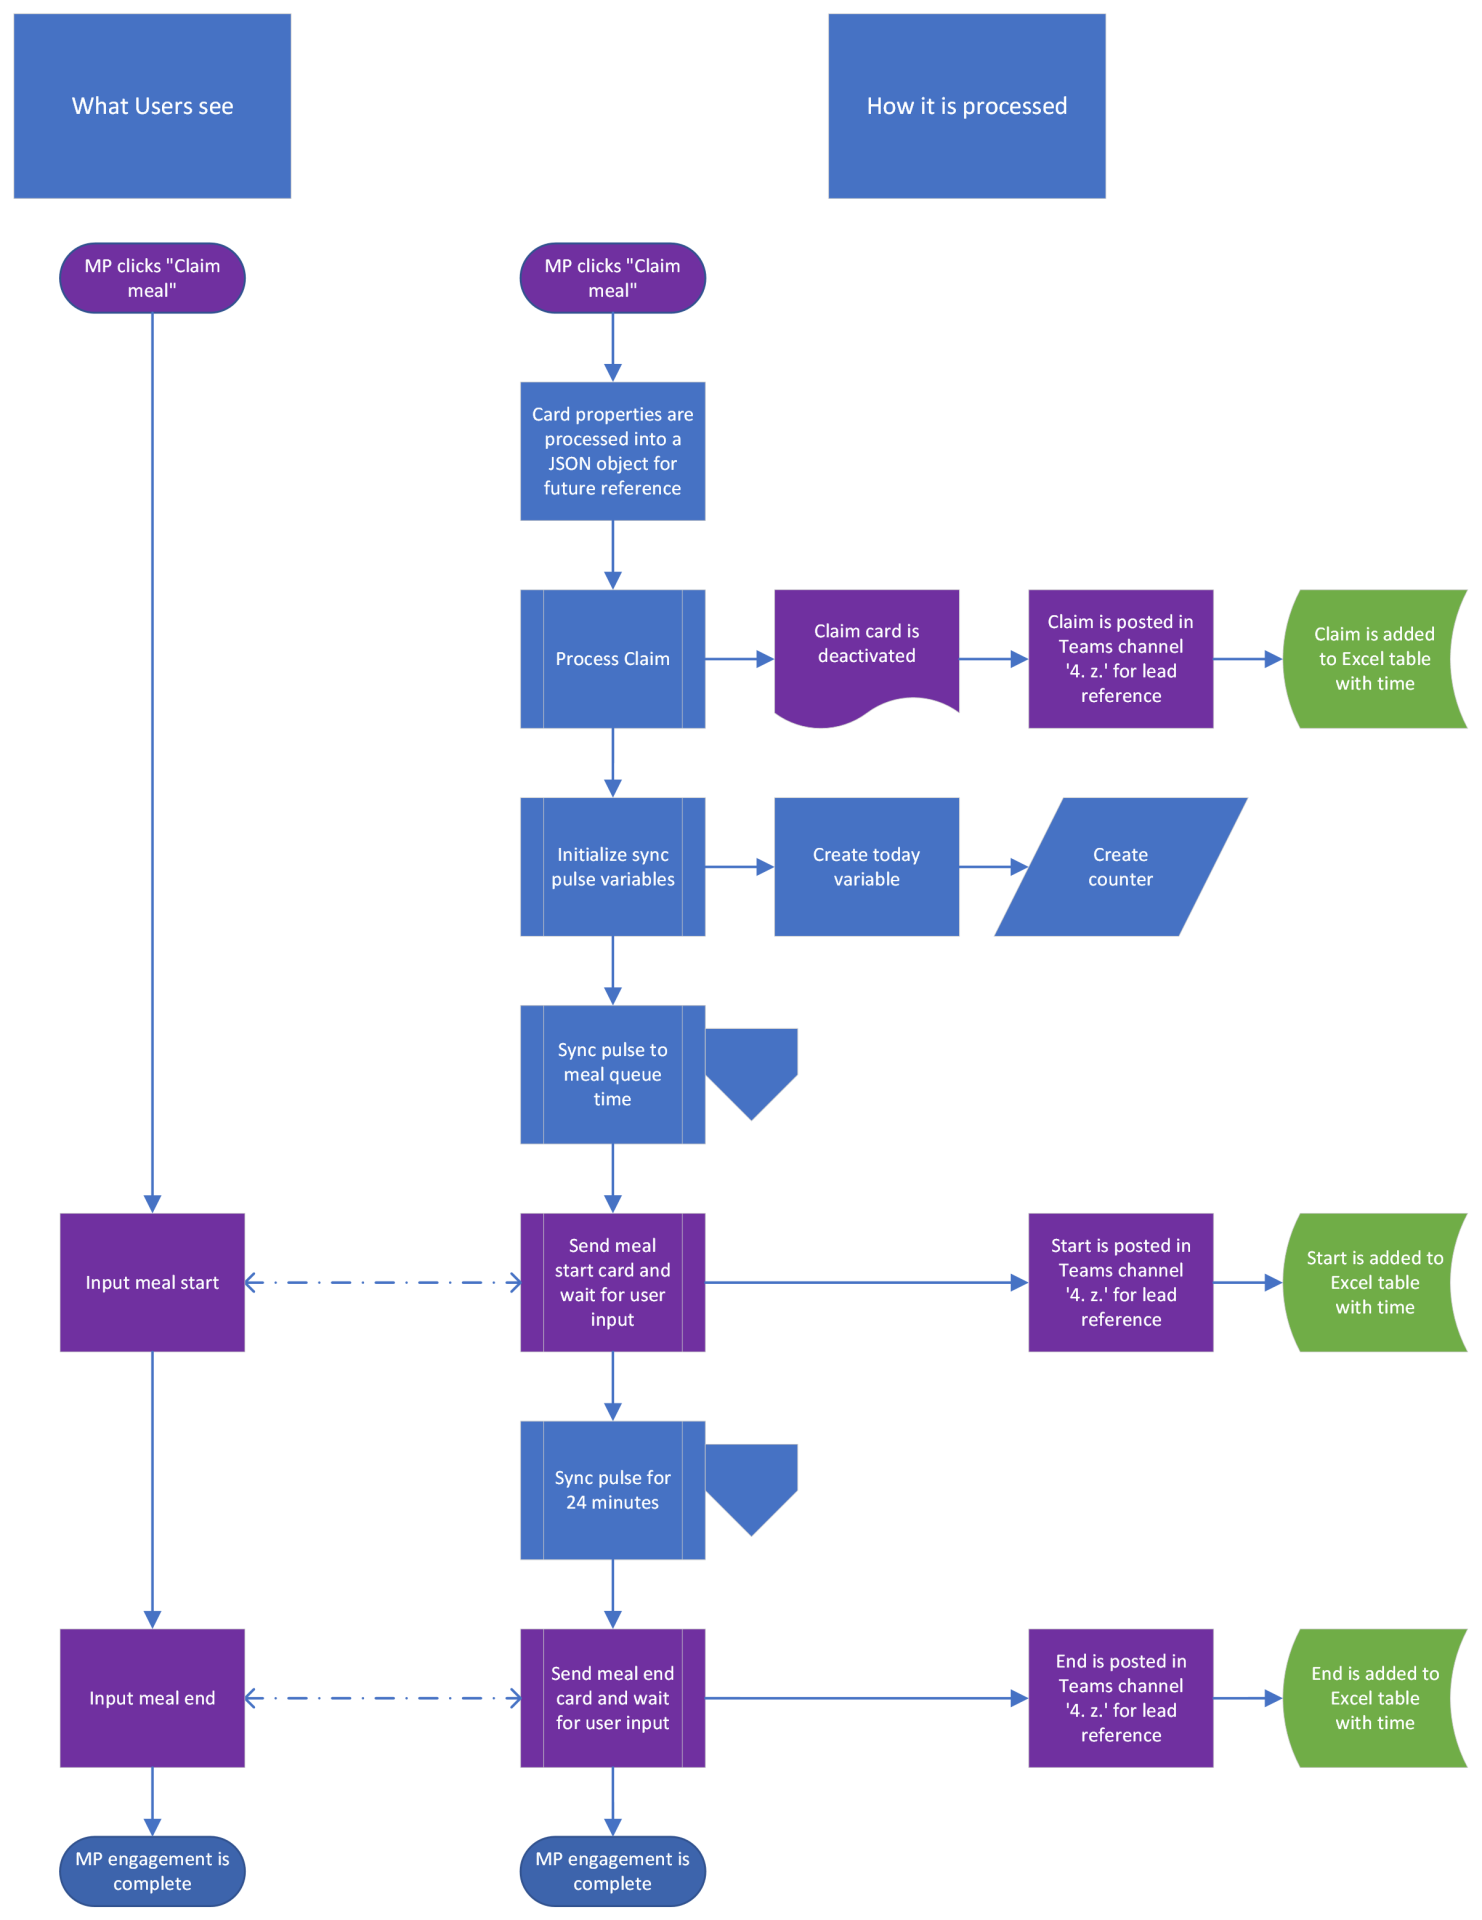
The actual problem is a solved one, which I think is important to note. We have a baseline that we can reference or augment to create a better solution. This also makes it easier to understand if progress was actually made. In general, there are only three (3) steps needed out of the employee.

  1. Employee claims their desired meal time.
  2. Employee communicates the gap in coverage.
  3. Employee communicates return to workstation.

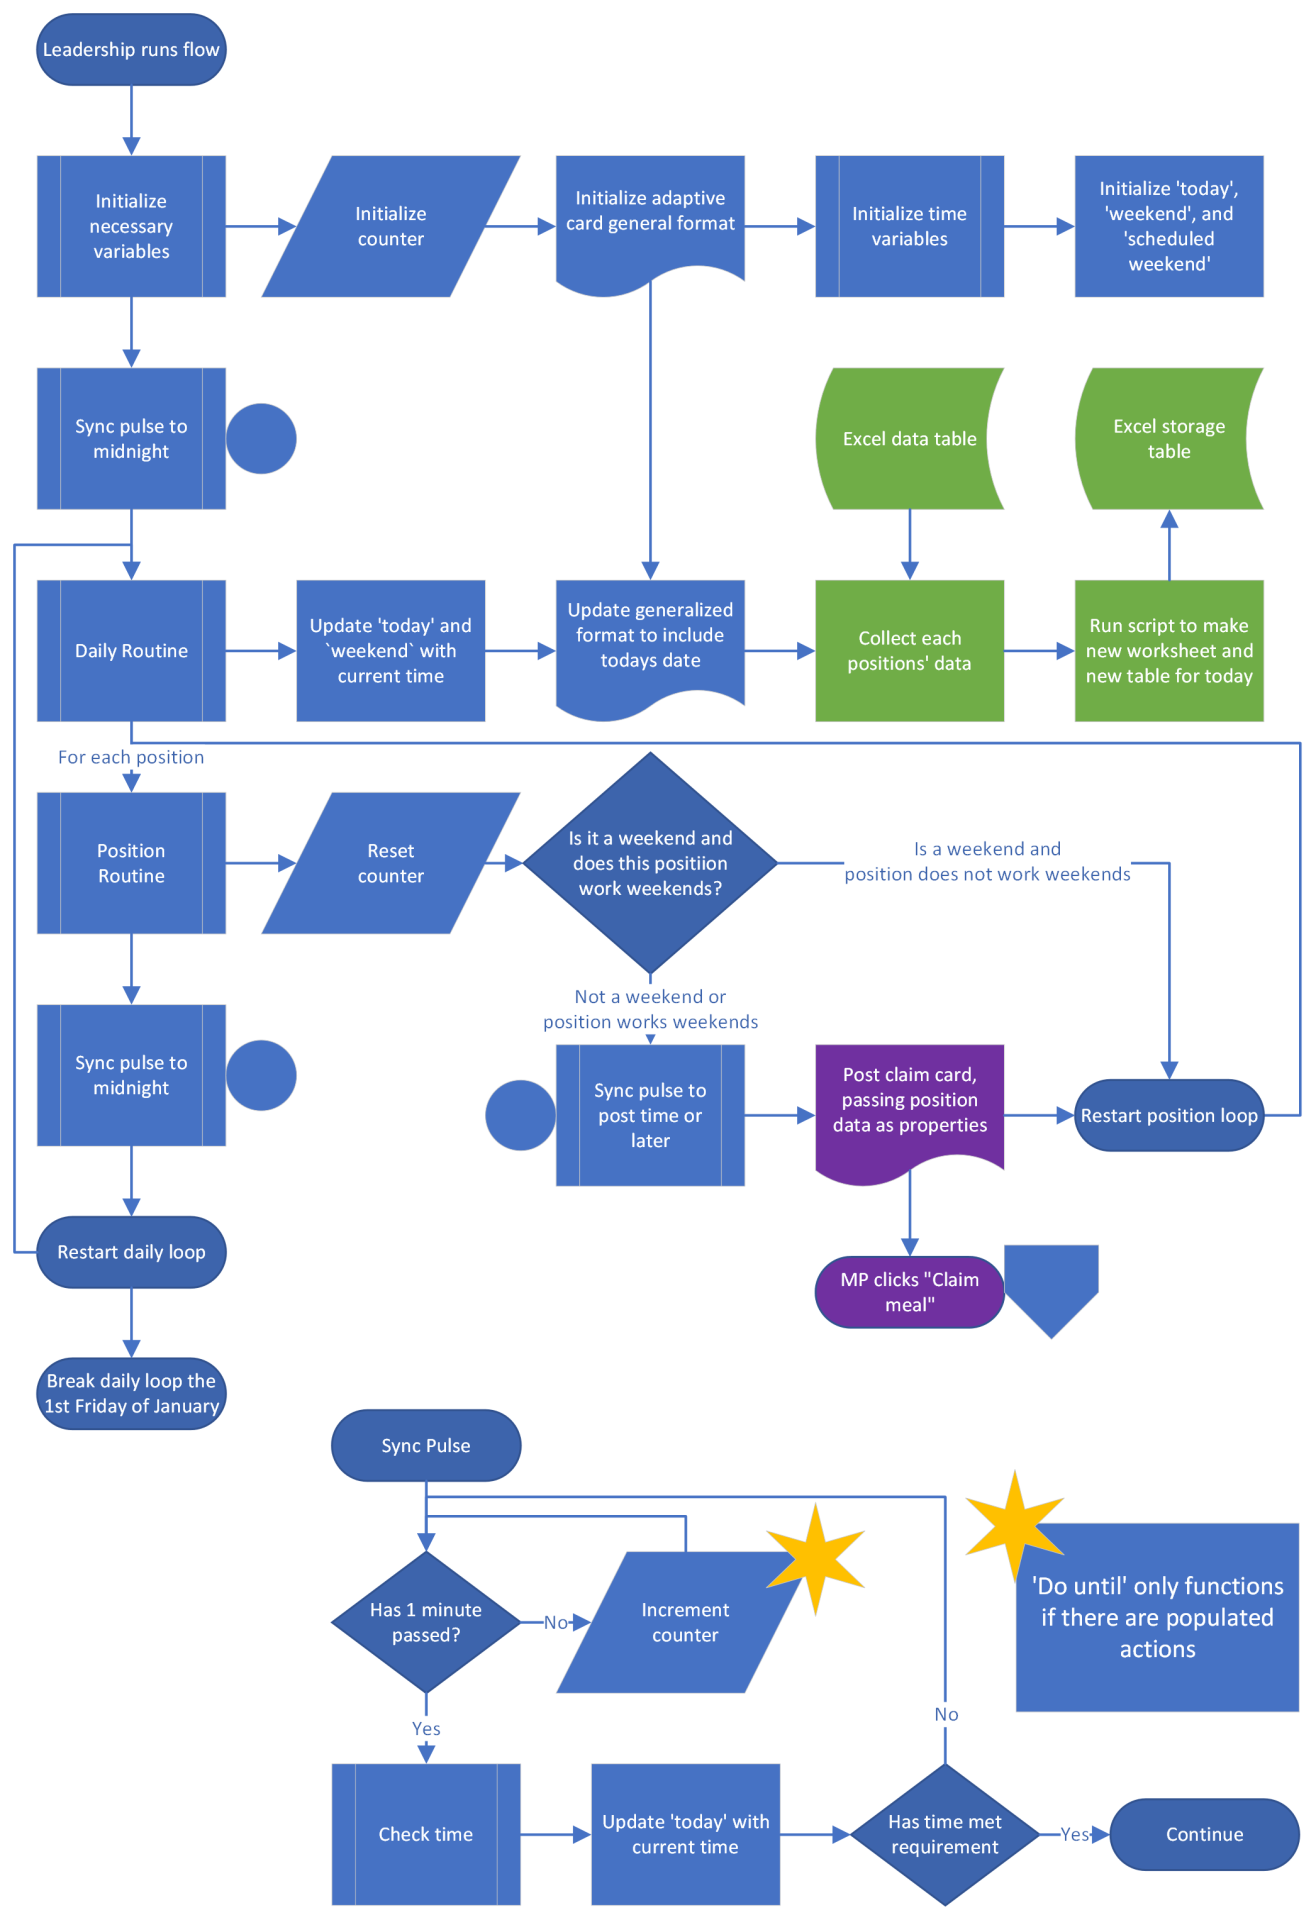
But on the backend, we need this information communicated across two (2) different channels: a short term and a long term one. Leadership needs a quick point of reference to know if and when their subordinates have been breaked. Department heads need to know trends of how long and when employees go on break. While my department loves to use Microsoft Word inappropriately, the long-term answer is an Microsoft Excel workbook that includes separate sheets for every day with a table containing all pertinent information: employee, claimed slot, start time, and end time. And since we are already in Excel, calculating the duration of breaks is as trivial as =[@[End Time]]-[@[Start Time]]. Short term can be contained within a Microsoft Teams channel that will already inherit the corporate retention policy. There is still one missing piece of information which is the start times of each shift and their available claims. Illinois requires employees to have a meal break starting within the first 5 hours of their shift. So in addition to the data output table, we would need a data input table to say when the shifts start being when the claim cards should spawn and when the expected scheduled meal starts. I elected to also have this tied to the start time as breaks may start slightly earlier than designated. With a table containing all the information we need, we can pipe each row into a claim card. All we have to do is receive user input.

Adaptive Card Interface

Since we are using Teams, it would be easiest to use native systems to detect user input. Using Microsoft Power Automate, we can spawn adaptive cards one of a few ways. Adaptive cards are an easy way to create consistency in design across platforms for getting user input. This can range from a digital business card to a tee shirt order form. Since we are using Power Automate to pipe data through the claim cards, each row will be its own entity with the submit action adding additional information. In theory, we could do this with radio buttons, but it will make more sense why we feed it through this way later. The cards themselves end up being very basic, titled with the slot’s name, the anticipated start and end times, and a submit action button, but they will be shared top level inside the channel itself, not requiring the end user to navigate a file structure. Originally, I designed it all to happen concurrently using the Power Automate command “Post an adaptive card in a channel or chat and wait for user input”; however, this requires the explicit creation and declaration of every position within Power Automate’s flow. Since this is a stop-gap solution, this wouldn’t be too much of an issue, but it does mean that I would have to explicitly declare every position. Instead, I used the command “Post a card in a channel or chat”, this differs in that it does not wait for user input directly. It triggers an event “When user interacts with an adaptive card”, which can be paired one of the card’s properties. Now, we just set the trigger property for all cards to be a meal claim event.

Meal Start and Meal End

Similar to meal claim cards, we can use adaptive cards to test user inputs of meal start. However, to prevent meal start cards getting buried in the user’s direct messages, we only submit it just prior to the user’s meal start time. And just the same, we can use the same method to wait to just shy of the user’s meal’s end (possession in English is great). We can even throw on the times we expect the user to go from the meal properties that were piped from the source card and then the submission time of meal start card. One problem I have been dancing around though is a big one, one that requires tricking Power Automate to do something it isn’t exactly designed to do.

Halting and Waiting within Power Automate

Power Automate makes it incredibly easy to do things concurrently or sequentially, but what it doesn’t like to wait. At least in the sense of specific durations or till a specific time while staying within the same flow. Something you can find in some form in most scripting languages is simply missing as an explicit function or command. That is without thinking outside the box.
Power Automate features a module called Control that has a command called “Do Until”. By its name, you would think that it in fact can wait until a specific time, but it is more like most languages while statements. It does commands until a condition is met. The question becomes how do we make it check the time to make it our needed halt script command. The obvious solution is to tell it to check the time and make that our condition. Using the expression utcNow(), we can see the current time. Using a bit of nesting, we get convertFromUtc(utcNow(),’Central Standard Time’) so I don’t have to explain to my boss why keeping track of time zones is a headache. Unfortunately for me, JSON does not natively have a time object, and in the infinite wisdom of the universe, JSON stores date-time like objects as strings. So to effectively get the hour, we use the expression float(convertFromUtc(utcNow(),’Central Standard Time’,'HH.mm')). This should allow us to use functions for time being equal-to or greater-than-or-equal-to to directly compare now to our target time. Since we are only going as far as to check minutes, we can tell the function only to check every minute. Where we once again run into the problem, how do we make it pause for time?
We can nest “Do Until” commands within each other, and we can almost make “Do Until” commands run indefinitely. That is with a big asterisk of its exit conditions. “Do Until” will not let you run something run indefinitely, there must be a count or time restriction associated with the command. That time restriction cannot be piped in as a variable. That does allow us to cleverly make something that runs for exact durations of time, like 1 minute. So “Do Until 0 equals 1 for PT1M”. This however causes a new problem, “Do Until” requires commands to function. In the outer layer of “Do Until” have “Do Until” and update the variable representing the current time. The inner layer needs something happening, like a counter that ticks up for no reason.

Review

Overall, discovering the solution was informative about the limitations of Power Automate, but also how to work around these limitations. Unfortunately, unlike with the included flowcharts, Power Automate does not let the user call lambda functions or subroutines. I hope in the future that Power Automate adds features like “halt for this duration” or “halt until this time” in a more official capacity. The hacky nature of the actual process is endearing in a way, but it also can be seen as headache for readability. And since the new designer for Power Automate has less than official ways to add comments, it becomes a bit annoying to explain why things function the way they do.
Stray Thoughts

Power Automate is extremely powerful, even without being an owner on a Teams account. It still permits me to post adaptive cards and read data from them which could be a bit of a security concern if Teams was actually more secure than it is. The nature of Teams only has the level of security that exists within an instance of Active Directory and SharePoint, the former is well known by most organizations. The latter is a bit cryptic, as it acts like an older version of OneDrive, something that uses Active Directory user permissions as its structure. But since it’s its own beast, it functions in a wholly unique way. So while Teams feels like an obvious answer to quick communication, it comes with its own set of challenges that are better answered by programs like Slack or Discord better. Do keep in mind that each comes with their own EULAs which may not work for your company.

Spreadsheets to YAML

One of the most important ways to learn why mistakes are made is by documenting them. Often, recurring treads show why an issue or mistake arises. However, large volumes of data aren’t considered human readable, at least for most people. While in the process of documenting numbers associated with the units on the campus that I work, I found issues with many of our badges and the software that creates them that needed to be documented. Reporting such findings though could be done with software like Microsoft Excel, but the person in charge of overseeing the software does not have a history in data or computer science. As my experience with The Wind Waker Randomizer dv_im reminded me, YAML allows for the construction, maintenance, and readability of data sets, at the small cost of physical space.

YAML is a data language built on many JSON and Python sensibilities. White space denotes relations between objects and their properties. Objects can be built within dictionaries or lists. These two properties are perfect for reporting types of issues as well as keeping things easy to understand.

A basic VBA YAML constructor wouldn’t be too difficult, but a more flexible solution would prove better in the long run. I had originally written this article just after building the more flexible solution, which actually became quite useful. I was only documenting issues that were presenting themselves on visitor badges and patient profiles, but it became clear we also needed to record when software misbehaved or crashed. Having the solution already accommodate new object types was helpful.

Here’s how it was constructed. I knew I wanted two object types: patients and visitors. Each object type would have its own properties we needed to keep track of, as what issues we cared about were different between these two in our visitor management software. Having two different interpreters would be a lot of work for very little benefit. Instead, we know our data table exists in the UsedRange property of our Worksheet object. The top of each column, with the exception of the first, represents the properties of our YAML objects, such as Creator. Each row, with the exception of the first, represents an object. Each cell in a row, with the exception of the first, then is the value or quality of that property, such as zyarnot. The first column represents the dictionary we are building and the keys to the objects within the dictionary.

Knowing how the data is structured in Excel will greatly assist in building a good and efficient system for reading then writing it in the destination format. First, we build a template for the dictionary entries. These will always start with "{1}:" so that we can find where the key must go later. Each cell in this first row represents the title of each property as well as the data type of each property. Unlike VBA, YAML is not explicit with its data types, we are more concerned with data types like lists or non-data types like comments. Each property is added to our template as "{t#}: {v#}" with v being replaced with another character so later the interpreter can recognize what it needs to with the line. Despite the fact comments will be full width without title, I found titles must be declared and inserted before replacing the line, otherwise VBA would error out. Repeat this for each column until the template is complete.

Filling the templates with Replace() is quick work given that every type is implicit except lists and non-data comments, though lists are just an extra step of replacing semicolon-spaces with a newline, an extra tab and a dash with the data then following. Comments must find and replace the title as well as the empty data. Unlike with most YAML interpreters, I elected to have lines with undeclared properties delete the line. If we needed to convert from the YAML back to other methods, I would have the object declaration have optional variables that have default values of empty strings.

This will complete a whole dictionary without much effort. Each dictionary then is just reading a sheet in excel. Again, instead of explicitly declaring “read sheets in this list”, instead it goes through sheets between the how-to and output sheet. Every time the user clicks on the output sheet, data is read and written to it, dividing at about every 37 objects to prevent potential data loss due to cell rendering limits.

Here’s an example of what this simple approach can do:

Input

VisitorsBadgeCreatorIn-opCreatedIssueComments
McTest, John99995zyarnotzyarnot2023.02.05.17.08.25Misspelled first name (no “h”); Misspelled last name (extra “t” at end)How many S’s are in “misspelled”?
Doe, John99994zyarnotzyarnot2023.02.04.21.02.12Wrong category (Should be “Visitor”)

Output

Visitors:
 McTest, John:
  Badge: 99995
  Creator: zyarnot
  In-op: zyarnot
  Created: 2023.02.05.17.08.25
  Issue:
   - Misspelled first name (no "h")
   - Misspelled last name (extra "t" at end)

# How many S's are in "misspelled"?

 Doe, John:
  Badge: 99994
  Creator: zyarnot
  In-op: zyarnot
  Created: 2023.02.04.21.02.12
  Issue:
   - Wrong category (Should be "Visitor")

Zachary Yarnot and DualVission do not hold any rights to these owners’ contents.
Microsoft Excel and Visual Basic for Applications are products of Microsoft Corporation.
Microsoft, Microsoft Office, and Microsoft Excel are registered trademarks of Microsoft Corporation.

Hue Saturation Value

Preface:

Color space representations are important for graphics rendering and a thorough understanding can help creators to effectively use them. Digital artists often are familiar with the standard RGB in sRGB or opRGB color space and its hexadecimal integer representation of the normally qualia-esque thing that is color perception. R, G, and B components then represent the long, mid, and short photosensitive cone ranges respectively. This approximates most colors a human can feasibly see, while keeping data rather small. However, this isn’t the only way to understand color and light.

HSV similarly stores 3 values that each represent light perceived, but instead represent the hue, saturation, and value as the channels. Files often do not store in color data HSV, instead opting to use RGB or color indexing, but HSV is arguably more useful artistically. Since tones and shades are modifications of the variables saturation and value, the exact effect of changing those is immediately obvious. Decreasing saturation will make the color less saturated. This same property does not easily apply in RGB, as decreasing the saturation while maintaining the general color value by small margins is nearly impossible without altering the hue. This is also true in lower color depth situations regardless of color space representation.

Most modern software is well equipped to go between the spaces no problem. That is with the exception of the scripted side of Office (2016 & prior at least). Excel (and other Office applications) will let you adjust the HSV while selecting a color through the UI, but it will store the color as a hexadecimal integer of RGB (stored in BGR order). Adjusting all the colors I want to the specific saturation and value necessary to all items manually is extremely time consuming and mind numbing. This is where VBA comes in handy. We have a problem that can be automated, or more accurately two problems.

Problem 1: Convert RGB values to HSV space

Ironically the easiest part of this how thing.

  1. Split up the single hexadecimal integer [values ranging from 0x000000 to 0xFFFFFF] into 3 floats [values ranging from 0 to 1] (doubles as named in VBA, though singles would likely suffice)
  2. Find the minimum, maximum, and range of those floats
  3. Given order cycle[R, G, B, R, G]
    • Where the first instance of maximum is indexed as i
    • Where the difference of maximum and minimum is d
    • hue = {d≤0: 0, d>0: (60°*(cycle[i+1}-cycle[i+2]))/d+i*120°) mod 360°
    • saturation = d/cycle[i]
    • value = cycle[i]

This all seems simple enough, building functions that effectively represent each step.

Problem 1.1: Interpreting RGB

This problem is basically built into Excel. Start by transferring the decimal long returned using the worksheet function Dec2Hex with the optional minimum return length as 6. The returned string will be 0xBBGGRR, splitting it with the function Mid, and converting it back to decimal with the worksheet function Hex2Dec before dividing it by 255. I recommend adding the optional argument for reversing the order of the input so you can use it for 0xRRGGBB order as well.

Problem 1.2: Hue Calculation

Calculating minimum, maximum, and range is so light weight, there is little reason to separate this as its own step. As well, my as-described functions work well in Python, the lack of lists makes this type of instancing a little less helpful. However, building a switch-case where you compare the maximum to each input instead is effectively the same. I also recommend adding 360° before doing function modulo on these values as function modulo behaves strangely when given negative floats to find the remainder of. While I elected to return a double for hue, I have only seen that function produce integers.

Problem 1.3: Saturation and Value Calculation

It’s honestly harder to get Office to not autocomplete sat as Saturday than calculate these. Value is simply the maximum return on inputs R, G, B while saturation is the ratio of range over maximum of those input.

Problem 2: Going back to RGB

I, as many would assume, thought this step would be easy. For just as many techniques posted only for going from RGB to HSV, there are as many bad techniques for going to RGB from HSV. Whether these functions are bad because of how VBA handles them or just because they were designed before 8-bit color depth is beyond me. This section will read a bit different than the last.

Problem 2.1: The piecewise function approach

  1. Where h' = floor(hue/60°)
  2. Where c = val*sat
  3. Where x = c*(1-|(h' mod 2)-1|
  4. Where m = v-c
  5. 0 ≤ h' < 1 ⇒ (R₁, G₁, B₁) = (c, x, 0)
  6. 1 ≤ h' < 2 ⇒ (R₁, G₁, B₁) = (x, c, 0)
  7. 2 ≤ h' < 3 ⇒ (R₁, G₁, B₁) = (0, c, x)
  8. 3 ≤ h' < 4 ⇒ (R₁, G₁, B₁) = (0, x, c)
  9. 4 ≤ h' < 5 ⇒ (R₁, G₁, B₁) = (x, 0, c)
  10. 5 ≤ h' < 6 ⇒ (R₁, G₁, B₁) = (c, 0, x)
  11. (R, G, B) = (R₁ + m, G₁ + m, B₁ + m)

Why this doesn’t work, I actually have no idea. As you will see with my actual solution, the idea cuts a slice of the color wheel pie into six sections. Each section represents the rise of one channel with the fall of another. The results I was seeing flattened results to the 6 slice edges.

Problem 2.2: The function of n approach

  1. Where k(n) = (n + hue/60°) mod 6
  2. Where f(n) = val - val*sat*max(0, min(k(n),4 - k(n), 1)
  3. (R, G, B) = (f(5), f(3), f(1))

Similarly, I cannot figure out why this wouldn’t simply work. Everything about the function makes some sense, but it resulted in 60° separations rather than actual hues. Maybe it has to do with how VBA does the function modulo.

Problem 3: Dissecting the problem

There was no use of modifying the hue, saturation, and value if there was no way to go back to RGB components. Logically, I needed to visualize the problem. Using Desmos, an online free graphing tool, I rebuilt the hue space graph from the piecewise function. Or more correctly recreate the graph it was emulating. It’s not that hard to recreate it in text, ▔╲▁▁╱▔. It represents over the circular period how much red is present in a given hue. Green is just that offset by 240° and blue by 120°. If I can accurately make that and have it function, we’d have our answer.

Problem 3.1: With Hue

As described before, red can be calculated from a piecewise function characterized by alternating highs and lows through a linear reduction between. This piecewise is periodic with relation to the cycle length, in our case 360° or 2π radians. Naturally, our first step is to find the modulo (remainder) of the input hue: h' = hue mod 360°. For added flexibility, I changed the period to be denoted as c: c = 360°h' = hue mod c. This may seem silly, but altering hue space is the end goal, allowing ourselves the future ability to change the period entirely should be the case. We have found our input for the piecewise function, now to figure out what that piecewise function is.

Segments as you find online described as 6 slices of 60°, but why is that? There is always going to be high state, one in low state, and one in state change. We can then assume that there are 3 segments of high each 120° that are then bisected by which other channel is in state change. The appearance of all three functions overlapping is reminiscent of a suspension bridge and triangle wave forms.

Problem 3.2: High and low states

Next, what is the high state? This is as suggested by the name, the channel that is the strongest or maximum. This just so happens to be our value as calculated before, so t(h') = valval ∈ [0, 1]. That last part does seem a bit confusing but is an unfortunate requirement of these equations. In theory, this all still works with 3 floating point values for R, G, and B where they exist outside of 0 to 1, but no sources I found online suggest this would work.

Low state is naturally, the opposite of high state, being the weakest or minimum channel. This won’t come as freely as high state, but it is embedded in our saturation, being the ratio between difference and maximum. Multiplying saturation by value returns our difference, multiplying by negative one and adding our value will return the minimum, simplified as f(h') = val*(1 - sat)val ∈ [0, 1] & sat ∈ [0, 1].

Our favorite restrictions are back, but here, they begin to make much more sense. With a negative saturation, the minimum would be greater than our maximum, which doesn’t make sense, so restriction could be sat ∈ ℕ. However, if value and or saturation is greater than 1, the output of (R, G, B) ∉ [0,1]³. People dealing with realistic lighting scenarios would have no problem with this; gleam or highlights can exceed 1 and subblacks can be clipped out. This does not fit within our 8-bit color restriction that exists in Office applications. So sandwiching a worksheet function Min with 1 and a worksheet function Max with 0 will keep those numbers in check.

Problem 3.3: Transitional states

As prior stated, these are linear transitions between t(h') and f(h') over c/6, well kind of. Looking at solving this for pure red slowly fading to pure yellow, the duration of change from 0 to 1 for the green channel is 60°, so aG(h') = h'/60°. Red will now decrease from 1 to 0 over 60°, so slope is -h'/60°. Plugging this in won’t have the results we desire, however. It needs to be offset by 2 to account for the shift by 60°, making d(h') = 2 - h'/60°val ∈ [0, 1] & sat ∈ [0, 1]. Those last restrictions can be removed if we consider how transforming this function actually works. The slope is descending 1 unit that is the maximum or val. Multiplying our entire equation, decreasing our requirements to d(h') = val*(2 - h'/60°)sat ∈ [0, 1]. As with any algebraic function, you can add another function to it, so naturally, you would assume d(h') ⊢= val*(2 - h'/60°) + f(h'). This assumption is wrong, as multiplying the slope only by the maximum does not account for when there is low saturation, as slope will continue to be entirely based on full variance. Multiplying the unique part of the function by saturation leaves it entirely based on the difference, making d(h') = val*sat*(2 - h'/60°) + f(h') or d(h') = val*sat*(2 - h'/60°) + val(1 - sat).

Future proofing with assuming that a cycle isn’t 360° is genuinely easy. h'/60° is a representation of 6h'/360°. Replacing 360° with c returns d(h') = val*sat*(2 - 6h'/c) + f(h') or d(h') = val*sat*(2 - 6h'/c) + val(1 - sat).

The ascending transitional state is also fairly trivial given our knowledge of when the states occur and the duration of ascension. When at zero, aG(h') didn’t need any offsets. When at the first sixth, d(h') needed an offset of 2, and descent will need to always be increased by an additional one to align with [0,1] space. We should expect at 240° that d(h') = val*sat*(6h'/c - 4) + f(h') or d(h') = val*sat*(6h'/c - 4) + val(1 - sat).

Problem 3.4: Piecewise referencing

Writing a piecewise function in VBA would be silly given the scripting language already has logic systems in place. For those math lovers, here’s what the function looks like given Desmos/Office notation: r(h') = {0 ≤ h' < c/6: t(h'), c/6h' < c/3: d(h'), c/3h' < 2c/3: f(h'), 2c/3h' < 5c/6: a(h'), 5c/6h' < c: t(h')}. As stated before g(h') = r((h' + 2c/3) mod c) and b(h') = r((h' + c/3) mod c). After setting this up in Desmos, you can really see how hue, saturation, and value shifting actually work. When you compare this to the piecewise solution described before, it becomes more confusing why it didn’t work. Maybe it has to do with when variables are assigned, causing it to become a rounding error. Breaking it down this way does make it far easier to understand why things need to be a certain way.

Bonus: Pseudosinusoidal ≠ Sinusoidal

Throughout this piece, you may recognize the continuous use of referring to the transitional state as linear, but why can’t truncated cosine wave function? They have the same period, peaking every rotation of a circle. To our eyes, rc(h') = val*sat*max(0, min(1, ½(2cos(h') + 1)) + val(1 - sat), but it only approximates the correct value. The peaks and valleys are 100% accurate, but transitioning is not as pretty. The ratio between this approximation and reality depends on saturation, becoming more extreme as it increases. Its gentler transition may be worth the margin of error for some.

Zachary Yarnot and DualVission do not hold any rights to these owners’ contents.
Desmos is a product of Amplify and Desmos Studio.
Desmos Studio and Desmos are trademarks of Amplify.
Microsoft Excel and Visual Basic for Applications are products of Microsoft Corporation.
Microsoft, Microsoft Office, and Microsoft Excel are registered trademarks of Microsoft Corporation.

The Wind Waker Randomizer dv_im

Link to Github archive
https://github.com/DualVission/archive-twwrando-dv_im
Repository archived 2022/7/30

Intro

One evening, I found myself in a stream with many community members I knew apart from the lead moderator and the streamer himself who was playing a custom branch of the Wind Waker Randomizer. With the assistance of j_im, I was able to translate my understanding of Python for Maya (PyMEL) to general scripting, as well as a better grasp of GitHub. Through this, I have learned much about cooperation, communication, and conceptualization through reading the preexisting scripts, the raw base game PPC assembly, and aid from others, like CrainWWR and tanjo3. This is how the project originally named v_im was born.

A Brief Overview of Game Randomizers

A randomizer is a class of game modification that changes some aspect of gameplay in an unexpected manner, often checked by a system known as logic. Action and adventure titles often get something known as an item location or check randomizer, in which collectables and their locations are shuffled among each other, creating a new and often unique gameplay experience through many of the same forms of engagement as metroidvanias or roguelikes. Logic, for this kind of randomizer, is a set of rules that define what collectibles are then required to reach a specific item location. For example, in The Legend of Zelda: Ocarina of Time, players must have a Deku shield and a Kokiri blade before they can access any location within the Great Deku Tree. Using logic, the randomizer would then decide nowhere within the Great Deku Tree is a valid location for either the Deku Shield or Kokiri blade but would be for the Fairy ocarina or any other number of items.

Kindling

DGod63 is a Twitch streamer known for playing randomizers of The Legend of Zelda franchise, who I found one night on which sometime in late May 2020 because of lost hours during the early SARS-2 pandemic. However, he was running the randomizer from source, allowing him to make additional modifications which in the past were denied by the sole developer of the randomizer. The modifications to the code enabled him to change the required number of dungeons for race mode, a setting which made all non-required dungeons illogical, effectively empty in the eyes of the player, locations and made required dungeons end in a hard-required item, an item needed to beat the game. At the then-current official 1.8.0, players either played without race mode or could only have 4 dungeons, not upwards of the 6 possible dungeons in the game or fewer.

Also around this time, another popular randomizer was transitioning its community season from 3 to 4, changing its hint policies making them less helpful. In the next official update of Ocarina of Time Randomizer, hints could only be set to this more conservative option, forcing players to either use an older build or use this new policy. A forked build, known as the Roman Build or Roman Branch, rapidly gained popularity as it allowed for either hint policy without disabling other newer features. The Roman Build acted, up to this point, as a testing ground for features that were highly requested, but that the main developers didn’t want to provide. Often the course of action was a feature being added to the Roman Build, it would be brought to the main branch, then the Roman Build would switch to the more concise version created by the main developers.

A Spark of Energy

I sought answers as to how I could also do variable race mode in the Wind Waker Randomizer, I had some knowledge of Python so it wouldn’t be too terrible, right? When I messaged DGod, his answer was simple, having only edited one number in the code as instructed by j_im, the community moderator. I followed the trail and j_im told me much the same, edit this number on this file to the desired amount. I, while now having my answer, was dissatisfied with this solution, as it would not provide easy access to anyone who wouldn’t or couldn’t run from source. I began testing and playing with a piece of software attempting to edit the Wind Waker Randomizer’s UI. But I began to realize why LagoLunatic, its dev, omitted this option, at least up to 6 dungeons; the higher number of required dungeons increased the number of hard required items that would be called up. In cases where players start with the full Triforce of Courage and were playing swordless, that would only leave the three progressive bows and the hookshot to be pulled instead. 4 items for 4 dungeons. This list would need to be extended to encapsulate the 2 additional requirements. However, in side effect of increasing the number of required dungeons, the number of hard required items also increased. As such, the power bracelets and iron boots were also added to the list, as they each only locked Earth and Wind Temple respectively.

I was coming to finalize this rough idea of a small update to 1.8.0, but I felt lacking a name, would be forced to be associated with my name. Another concern I had was competing with Lago’s main branch. It would effectively create a self-cannibalizing market between the two branches, which is not what I would want. I simply wanted to push Lago to add this feature to the randomizer. Without much thought, the name v_im was selected, a basic portmanteau of j_im’s and my screennames. Between d_im and v_im, the answer was fairly obvious, and I felt it best represented the amount of work that each party had made towards this idea. Before I released this on the world, I checked to make sure I wasn’t saying something terribly offensive, only to find that “vim and vigor” was a turn of phrase. Vim means with, of, or pertaining to energy. However, I was not prepared for what would happen.

An Open Flame

DGod was not much larger than other streams I was watching at the time, but as the pandemic continued, his audience grew. A small project intended to make a few peoples’ lives easier was now on display for a large audience. A direct link at the command input of “!v_im”. As the idea that there was more to the Wind Waker Randomizer, more people began airing ideas they felt was missing or lacking. I had not completed a small task but checked a small box on a much larger list. It was known I was effectively unemployed and capable of basic level programming/scripting. Despite what I had thought originally, it was a good feeling, helping bring joy to people. A new version but not many changes in retrospect, it was becoming more clear v_im was becoming more the community and me and less j_im. It was a great name but it was lacking, at least in terms of representing my brand. The answer was a simple rebranding.

An additional “d” was prefixed to the existing name, it would prevent confusion as v_im is just dv_im prior to 1.8.0d. This naming schema matched my other scripting projects, at least on an internal naming level. All my script files up to this point were named “dv_” followed by its function (eg DV Artistic Material Generator is dv_artistic_material_creator). With a subtle name change, also came an imagery change. The use of Hyrule Warriors: Definitive Edition’s Sail of Red Lions might have been a bit vain, effectively treating dv_im as a level up to its source branch which uses the Swift Sail, which acts as the level of weapon proceeding the Sail of Red Lions. However, the sail itself I found hard to read at lower resolutions like in-game, so a question mark was used in place of its imagery.

Playing with Fire

Luckily, I was kept grounded by my shortcomings. I am not a programmer by trade or study, errors and oversights were not an uncommon sight. That still didn’t stop the steam of desired features, one I had been longing for some time. The unedited the Wind Waker Randomizer logic is what can be called a glitchless or trickless logic set. Every expectation it had of the player was that in base game. Players would never be expected to store the item-get cutscene hitbox to sneak around an area. However, all prior attempts of glitched logic came with one tradeoff, they only would exist in place of standard logic. I needed to find a solution that would leave regular logic usable. The UI would be easy, but the backend would be difficult. I found two points where logic could best be edited before it was loaded and towards the end of loading. I decided to go for the latter, referring to it as “logic injection” as it would interrupt and replace some bits of data, requiring the least editing and redundant information for anyone creating a custom logic type.

This caught the attention of community member CrainWWR, who was a the Wind Waker HD speedrunner. The logic sets I had implemented all were fairly basic, representing a scale from standard to what most randomizer players do already. However, Crain had a different idea, what is the fewest required items to get to any particular check. Sure, no logic existed, where there were no checks, but what if there was a checking system, but it only ensured the seed was beatable, but just barely. It was a bad idea due to high risks of bottlenecking, but my primary drive was player options. I was going to play this, but someone might. Though this may have been what brought Crain onboard, he is still a large part of the team and a heavy hitter for dv_im coding.

Throwing Shadows Forward

This project naturally spun to be much bigger than the sum of its parts, dv_im still represents somewhat of a success story. In my eyes, it is still not finished. Going forward, there are a few things Crain, Tanjo, and I have in mind: alternative game modes, alternative objectives, more checks, retooling, and player choice. The next project I am looking at is rebuilding entrance randomization, increasing a player’s ability to choose which locations are included or omitted. As is now, players can only choose to do all cave entrances, dungeons, both, all together, or none. While this is fine and dandy, this means a player would be expected to visit Star Island even if they have combat caves disabled, which is odd in comparison to most other things in the randomizer.

As a long-term goal, Crain was hoping to implement “pot rando”, a sort of alternative to the current boat navigation system. This system is far from even usable; however, we have created a system to create stable branching graphs that will be the core of this. Crain designed it first in Java, I recreated it in Python, and Tanjo optimized and improved it.

dv_im exclusive features:

  • Starting Conditions:
    • Dungeon Mode
    • Editable base health
    • Hints
    • Randomizable dungeon number
    • Randomizable starting Triforce number
    • Randomizable starting items
    • Text kerning
  • Randomization:
    • Additional boss rewards
    • Editable item pools
    • Logic Types (including custom)
    • Not Logic
    • Randomizable Wind Waker, Ballad of the Gales, Wind’s Requiem, Song of Passing, and Swift Sail
    • Remove dungeon nonprogressive items
    • Removable health increase items
    • 28 Additional Checks
  • Customization:
    • Animation editing
    • Disable parts of model items
    • Editable spoiler log output
    • Sail choice

DV Artistic Material Generator v1.3.2

Latest Release
Help Page
Text Defined Format Help Page

This is a script for Maya 2017+ for use with Solid Angle Arnold 5.1+, Pixar RenderMan 22.2+, and more for Maya.

This script functions with Maya 2016, Arnold 4, RenderMan 21 and other renderers; however, complete automation is not guaranteed.

Download the current version of the script.
Download the text defined format reference sheet.
Download the archive ZIP with both.

This script allows users to generate and populate popularly used channels on physically based renderers materials. With its UI, users can select file location as well as export for multiple renderers. With text defined format, advanced users can also connect to their own renderers.

This is for artistic metallic, dielectric, and glass objects: hard opaque plastics, soft rubbers, clothing, cutlery, skin, wood, bottles, etc.

Change Log
  • Fixed ramp luminance issue for spcColor
  • Fixed error dialogue for file pathing
  • Adjusted UI widths
  • Added bdBase attribute type
  • Added Python core “os”
  • Added TDF
  • Added UI associated with TDF
  • Changed attribute list formating for TDF
  • Small changes for sssMock future-proofing

DV Artistic Material Generator v1.3.0

Latest Release
Help Page
Text Defined Format Help Page

This is a script for Maya 2017+ for use with Solid Angle Arnold 5.1+ and Pixar RenderMan 22.2+ for Maya.

This script functions with Maya 2016, Arnold 4, and RenderMan 21; however, complete automation is not guaranteed.

Download the current version of the script.
Download the text defined format reference sheet.
Download the archive ZIP with both.

Download this version of the script.

This script allows users to generate and populate popularly used channels on physically based renderers materials. With its UI, users can select file location as well as export for multiple renderers.

This is for artistic metallic, dielectric, and glass objects: hard opaque plastics, soft rubbers, clothing, cutlery, skin, wood, bottles, etc.

Demo Reel

Legal

All copyrights are held by their respective owners.

All content is created within Maya®, Mudbox®, Substance Painter, and Adobe Creative Cloud under an educational license or within Atom and NukeX. Recording done through Open Broadcast Software. Rendering done through Arnold, RenderMan, and Maya Hardware Renderer under a non-commercial license.

Zachary Yarnot and DualVission do not hold any rights to these owners’ contents.
“Void Pt. 2 (Renovation Mix)” is a piece by Kubbi for μCollective.
Seafarer : The Captain is a creation of Sketchfab user Hushal-Pants.
Crocodile/Ageo is a creation of RAKUROBIT and modeled by Seanna Alanes.
Autodesk®, Maya®, and Mudbox® are registered trademarks of Autodesk, Inc.
Arnold is a Trademark of Solid Angle, a subsidiary of Autodesk, Inc.
Adobe Creative Cloud and Adobe are Trademarks of Adobe Inc.
NUKE and Foundry are Trademarks of The Foundry Visionmongers.
Disney®, Pixar®, and RenderMan are registered trademarks of The Walt Disney Company.

Zachary Yarnot and DualVission are in no way related to or endorsed by these companies – or creators – or their brands. The actions of said persons are not in any way connected to or encouraged by other mentioned parties.

DV Artistic PxrSurface just got an upgrade

Coming soon, a major update to DV Artistic PxrSurface Generator. So major, I had to change the name.

Introducing DV Artistic Material Generator

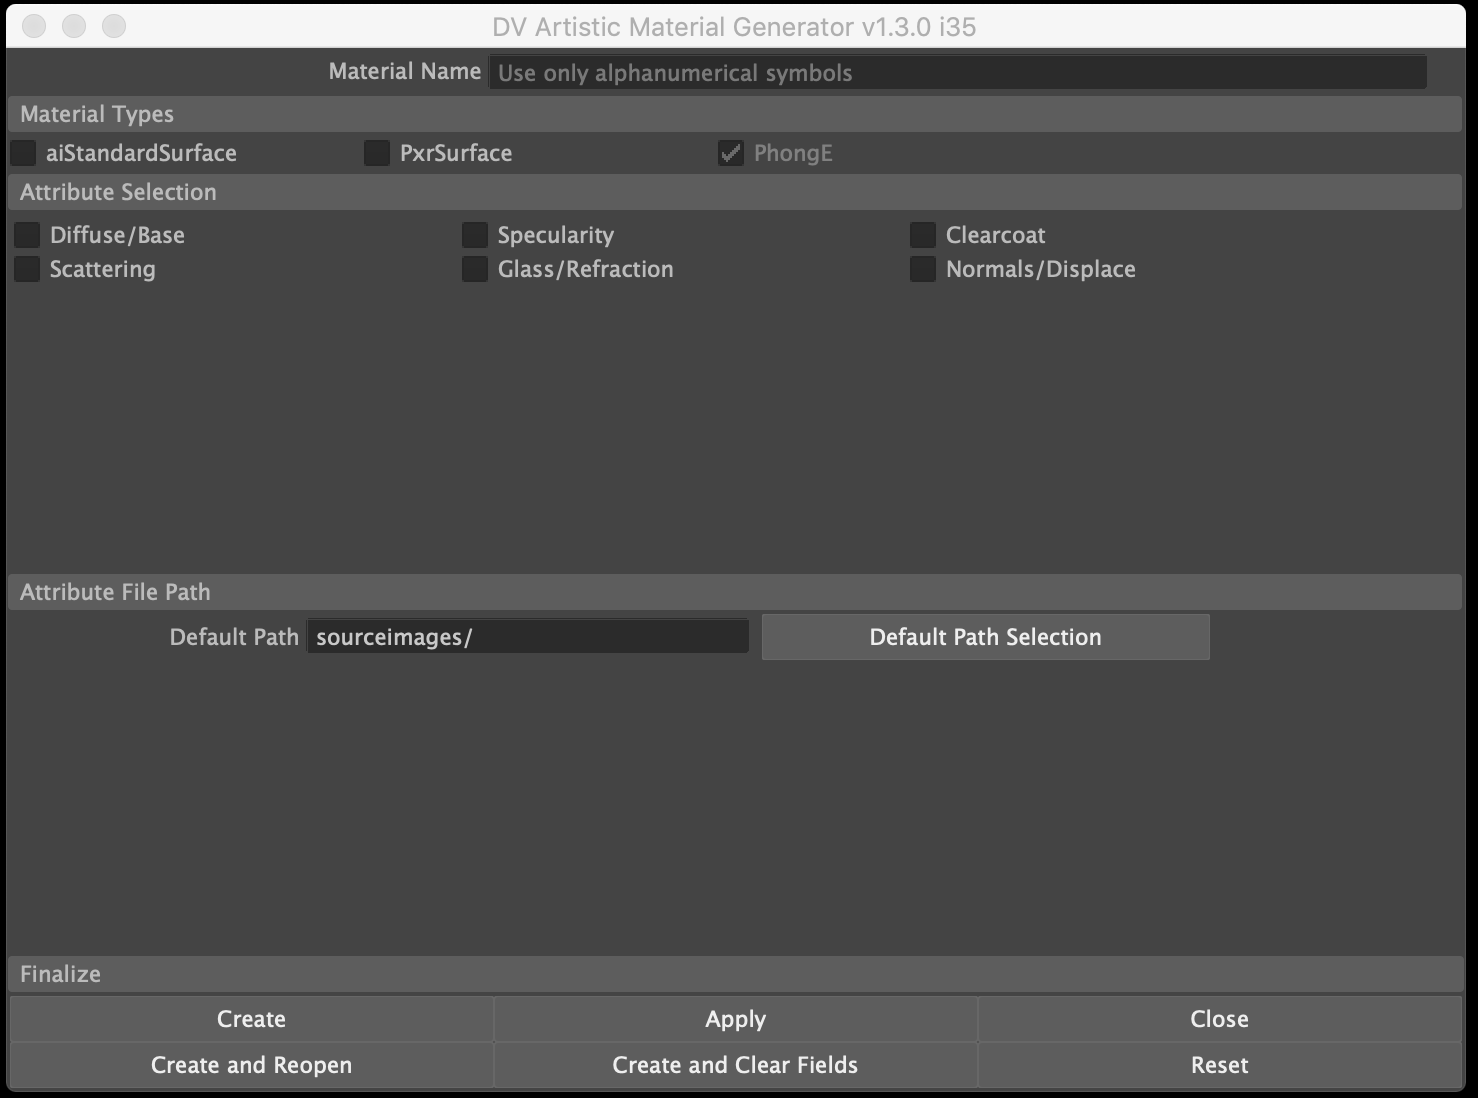
This modular script allows for the creation of multiple materials for various renderers at once. DV Artistic Material Generator 1.3.0 will support Solid Angle Arnold®️ and Pixar RenderMan®️ at launch with more as demand goes up. This script also allows visibility within the viewport for most supported lobes.

Use maps like diffuse, specular edge/face, clearcoat thickness, glass Fresnel angle, and more are supported, allowing the creation of realistic and artistic materials alike.

DV Glass PxrSurface Material Generator v1.0.0

This is a script for Maya 2017 and Maya 2018 for use with RenderMan for Maya 22.0 onward.
This script functions with RenderMan for Maya 21.0 onward and Maya 2016; however, complete automation is not guaranteed.

Help Page

Download script here

This script allows users to generate and populate popularly used channels on PxrSurface or PxrLayer materials. With its UI, users can select file location as well as advanced options, such as color correction model types and normal map direction.

This is for artistic clear or translucent objects: glass cups, plastic bottles, eye surfaces, etc.

DV Artistic PxrSurface Material Generator Legacy v1.2.2

This is a script for Maya 2017 and Maya 2018 for use with RenderMan for Maya 22.0 onward.
This script functions with RenderMan for Maya 21.0 onward and Maya 2016; however, complete automation is not guaranteed.

Help Page

Download script here

This script allows users to generate and populate popularly used channels on PxrSurface or PxrLayer materials. With its UI, users can select file location as well as advanced options, such as specular model types and normal map direction.

This is for artistic metallic objects: hard opaque plastics, soft rubbers, clothing, cutlery, etc.

Fixes and changes from legacy version 1.0.0:

  • Added file selection option
  • Added channel description
  • Added error codes
  • Broke up UI into channels
  • Added PxrLayer functionality
  • Added mass creation options
  • Removed RenderMan texture attribute adding
  • Used file nodes over PxrFile nodes
  • Creates lambert material for viewport visibility